This post is a quick instruction for installing Postgres 9.2, PostGIS 2.0 and pgRouting 2.0.
- For Postgres, download the installer from enterprisedb.com.
- Run the installer. You’ll have to pick a superuser password – remember it, you’ll need it again soon.
- At the end of the installation process, allow the installer to start Stack Builder.
- In Stack Builder, select the Postgres 9.2 installation and install PostGIS from the list of available extensions.
- The PostGIS installation procedure will prompt you for the superuser password you picked before.
- I suggest letting the installer create a sample database We’ll need it later anyway.
Now for the pgRouting part:
- Download the pgRouting zip file for your system (32 or 64 bit) from Winnie.
- Unzip the file. It contains bin, lib and share folders as well as two text files.
- Copy these folders and files over to your Postgres installation. In my case
C:\Program Files\PostgreSQL\9.2
Installation – done.
Next, fire up pgAdmin. If you allowed the PostGIS installer to create a sample database, you will find it named postgis20 or similar. Otherwise just create a new database using the PostGIS template database. You can enable pgRouting in a database using the following steps:
- In postgis20, execute the following query to create the pgrouting extension. This will add the pgRouting-specific functions:
CREATE EXTENSION pgrouting;
- Test if everything worked fine:
SELECT pgr_version();
It should return
"(2.0.0-dev,v2.0.0-beta,18,a3be38b,develop,1.46.1)"or similar – depending on the version you downloaded.

How about some test data? I’ll be using the public transport network of the city of Vienna provided in GeoJSON format from http://data.wien.gv.at/daten/geo?service=WFS&request=GetFeature&version=1.1.0&typeName=ogdwien:OEFFLINIENOGD&srsName=EPSG:4326&outputFormat=json:
- Just copy paste the url in Add Vector Layer | Protocol to load the dataset.
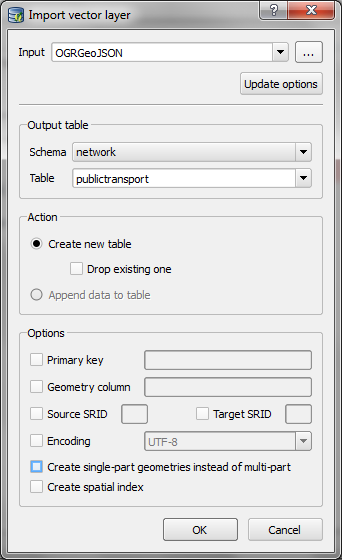
- Use DB Manager to load the layer into your database. (As you can see in the screenshot, I created a schema called network but that’s optional.)
- To make the line vector table routable, we use pgr_createTopology. This function assumes the columsn called “source” and “target” exist so we have to create those as well:
alter table network.publictransport add column source integer;
alter table network.publictransport add column target integer;
select pgr_createTopology('network.publictransport', 0.0001, 'geom', 'id');
I’m quite generously using a tolerance of 0.0001 degrees to build the topology. Depending on your dataset, you might want to be more strict here.
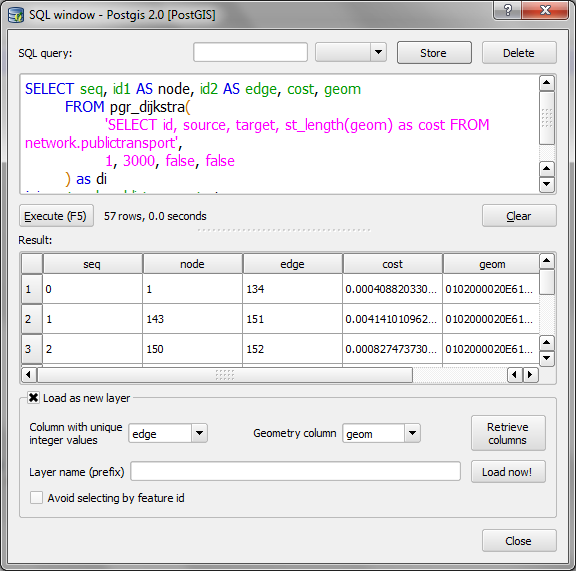
- Let’s test it! Route from source #1 to target #3000 using pgr_dijkstra:
SELECT seq, id1 AS node, id2 AS edge, cost, geom
  FROM pgr_dijkstra(
    'SELECT id, source, target, st_length(geom) as cost FROM network.publictransport',
    1, 3000, false, false
  ) as di
  JOIN network.publictransport pt
  ON di.id2 = pt.id ;
Note how the query joins the routing results and the network table together. (I’m aware that using the link length as a cost attribute will not lead to realistic results in a public transport network but bear with me for this example.)
- We can immediately see the routing results using the Load as new layer option:

Nice work! pgRouting 2.0 has come a long way. In a post from April this year, Boston GIS even announced to add pgRouting into the Stack Builder. That’s going to make the installation even more smooth.


