In spring 2011, the Quantum GIS project will hold a QGIS Developer Meeting, aka ‘QGIS Hackfest’ in Lisbon, Portugal. Proposed dates are (both Thursday to Monday):
- (14)-15-16-17-(18) April 2011, OR
- (28)-29-30-01-(02) April/May 2011
In spring 2011, the Quantum GIS project will hold a QGIS Developer Meeting, aka ‘QGIS Hackfest’ in Lisbon, Portugal. Proposed dates are (both Thursday to Monday):
New symbology has been around for quite a while now, but the last weeks have seen some great new additions to this functionality. Let’s have a look at what can be achieved:
Using ‘Marker Placement’ options in ‘Marker Line’, we can now create fancy arrows pointing in or against line direction.

Arrow style for line layers using 'Marker Lines' and specialized marker placement
Using ‘Marker Line’, we can also create nice looking railway styles. The ‘sleepers’ are created using vertical line markers at certain intervals.
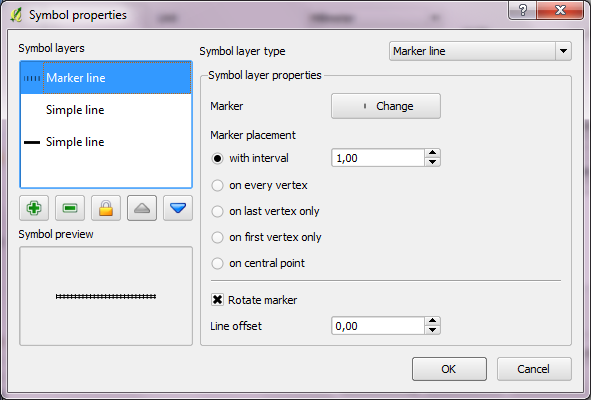
Rail style with 'Marker Line' at certain interval
Besides normal and SVG polygon fill styles, new symbology now offers centroid and outline styles. Outline styles offer all options found in line style dialog (simple, marker and line decoration).
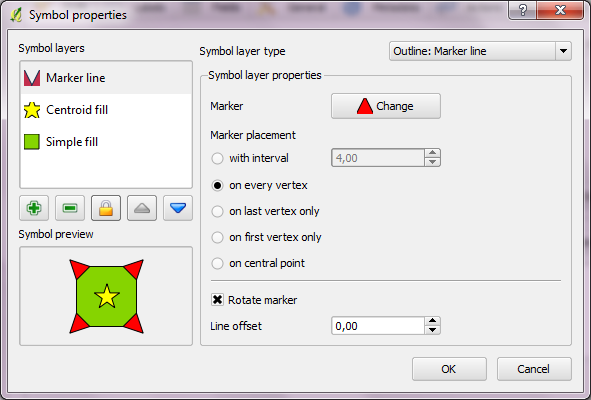
Fun polygon style using fill, outline and centroid layer
QGIS community has developed some interesting new features over the last weeks:
The time of old symbology is running out. It will not be available for QGIS 2.0 anymore, but who will miss it? The development speed of QGIS symbology in the last months has been simply astonishing!
This year, the QGIS community is not writing their wish lists to Santa Claus. This year, we get to send our wishes to kCube!
You will find the wish list on the QGIS Wiki. The page is aimed at collecting ideas for features and tasks that can be assigned to the 6 months of developer time being donated by kCube Consulting. Later, there will be a poll to find the most useful contributions.
Have your say and post your ideas! And don’t hesitate to follow kCube’s example ;)
Nathan from woostuff.wordpress.com has compiled a descriptive comparison of MapInfo and QGIS. He presents the up and downsides of QGIS compared to one of the major commercial GIS around.
The QGIS community presents two new case studies:
QGIS and GRASS applied to paleontological survey in Western Portugal by André Mano
QGIS as major GIS software in the Laboratory on Experimental and Applied Geography by Jakub Trojan
Globe plugin had it’s first big presentation at FOSS4G 2010:
(This video is part of a series of videos titled “Comparison of Open Source Virtual Globes”.)
The globe plugin is a C++ plugin based on the threading branch and can be
downloaded from
http://github.com/sourcepole/qgis/tree/threading-globe
To install Globe plugin, you can use Marco Bernasocchi’s install script. Thanks Marco!
Sourcepole (the developers of Globe plugin) promise that as soon as the threading branch is merged into trunk, globe should make its way into trunk as well.
Creating high-resolution output with QGIS can be tricky. “Save as image” saves the current map extent and creates a world file, but the output size cannot be specified directly. It simply saves the currently visible map. Most of the time this resolution will not be satisfactory.
Using “Print Composer” enables you to create full-grown maps including legend, scale bar, text annotations, north arrow, attribute table, decorations, etc. You are free to chose any size/resolution for the output image. Unfortunately, this way you will not get a world file.
That’s where the third possibility comes in handy: Using QGIS from command line to create a snapshot of a map. This way, you can create images of any size and with corresponding world file. The work-flow can be divided into the following steps:
C:\...>qgis --project myproject.qgs --snapshot image.png
            --width 1500 --height 1000 --extent xmin,ymin,xmax,ymax
QGIS will start, load the project, create the snapshot, and close again. That’s it!
Things to be aware of: QGIS will start, load the project, set the given extent (if specified), enlarge the map canvas and then take the snapshot. As a consequence, the extent given doesn’t match the extent of the resulting image. The image will have a bigger extent and contain surrounding areas.
Together with the new labeling tools this can be a fast and (semi-)automatic way to create nice looking high-resolution map images and corresponding world files from QGIS projects.
A great enhancement has been added to “Delimited Text” plugin today. It allows the use of a geometry column formatted as well known text (WKT), as an alternative to using x and y columns to define point features.
To view a delimited text file as layer, the text file must contain:
id|wkt
1|POINT(172.0702250 -43.6031036)
2|POINT(172.0702250 -43.6031036)
3|POINT(172.1543206 -43.5731302)
4|POINT(171.9282585 -43.5493308)
5|POINT(171.8827359 -43.5875983)
Update: Tim has posted a video tutorial: Video tutorial #2: Delimited Text Plugin
QGIS 1.6 is now officially released. Read the announcement on QGIS blog for information on new features or go directly to the download page.
Update: The QGIS manual has also been brought up-to-date.

